For whoever installs and runs it
Installation and maintenance
The application is installed on a Windows machine that can reach the customer's Logo database, and runs there as a Windows service. Installation is a single file you double-click; the browser opens by itself and you go through three short steps.
1. Requirements
- Operating system: Windows 10/11 or Windows Server 2016 and above, x64, administrator rights.
- .NET: not required. The package carries its own runtime (self-contained, win-x64).
- SQL Server: a reachable instance. No separate database is needed — the application keeps its own tables inside the customer's Logo database, named
dbo.TCMBKUR_*. - Logo: the Logo database and the company numbers; you need to know which companies the rates are written for.
- Internet: port 443 to
https://www.tcmb.gov.tr(the daily bulletin) andhttps://lisans.erp.tr(ERP online services: product activation and updates).
The application writes to the Logo database and, since 1.5.0, keeps its own
tables there as well — so NT AUTHORITY\SYSTEM must be db_owner in
that database. The installer grants this itself; if it cannot, it stops and prints the SQL to
run. Because the service runs as
LocalSystem, the NT AUTHORITY\SYSTEM account needs write
permission there. Without it the rates are still fetched but the write step fails — the
exact error is in the FAQ.
2. Installation (a single file, 5 minutes)
Changed in 1.5.3. Installation is a single file:
TcmbKurKurulum.exe. There is no zip to extract, no PowerShell to run, no
Unblock and no execution policy to change — the application, the updater and the
installation logic are all inside that one file.
-
1
Download it
Take
TcmbKurKurulum.exefrom the Download the installer button on the product page. -
2
Double-click it
If SmartScreen appears, choose More info → Run anyway, then UAC → Yes.
-
3
Go through three steps
The browser opens as soon as the files are in place: Logo folder → Database → Install and start.
What is the "Windows protected your PC" message? Windows SmartScreen shows it for unsigned files that have not yet been downloaded widely; it is not a virus report. If you want to be sure, compare the file's digest with the SHA-256 value published on the product page:
Get-FileHash .\TcmbKurKurulum.exe -Algorithm SHA256What the installer does
- Extracts the files into the folder you choose. If the product is already installed on this
machine, that folder is offered (the installer finds it from the service
registration, from its own installation record, or from the updater's settings); on a first
install the default is
C:\ERP\TcmbKur. - Picks the first free port in the 5230–5299 range and writes it to
listen-url.txt. - Installs and starts the
ERP TcmbKurWindows service. - Installs the automatic updater (section 5).
- Waits for the
/healthzhealth gate. - Opens the setup screen in the browser.
The installer does not ask for Logo or SQL details: the service starts without database settings and takes you straight to the setup screen.
The setup screen — three steps
The screen fills in whatever it can find for you; on most machines you only say Next → Next → Install and start.
- Logo folder — found from the
LOBJECTS.EXEregistry entry and the usual paths; filled in when there is a single candidate. It is optional. - Database — the SQL Server instances on the machine are scanned and the Logo databases are listed with their company and exchange-table counts; a single candidate is selected. If yours is not listed, type the server and database name under "Not listed / another server".
- Installation — a summary is shown; Install and start tests the connection, grants the SQL permission, creates the tables, writes the settings file and starts the service.
If the Logo database is on another server (10.31.18.133, say)
that server may not accept the Windows identity — you will see
Login failed for user …. Choose Authentication → SQL Server user
and enter the user name and password. The password is written to the settings file encrypted
(machine-scoped DPAPI).
The setup screen can be reopened later at
http://127.0.0.1:<port>/setup/index.html.
The support route. If company policy blocks unsigned
executables, the same build is also published as
TcmbKur-Logo-<version>-win-x64.zip: unzip it and right-click
install.ps1 → Run with PowerShell (or
powershell -ExecutionPolicy Bypass -File .\install.ps1). It does the same work
and opens the same setup screen.
The -AppDb parameter was removed in 1.5.0; there is no separate application database any more.
The last wizard step asks for the administrator password. If you leave it empty, the first
sign-in is admin / admin and the password must be changed during
that first session. The completion screen states the credentials — that is
the only thing you need to write down.
3. Setup wizard
When the panel opens, /kurulum (the same screen also answers at
/ayarlar) collects the settings in six steps. You can move back and forth
between the steps and save on the last one.
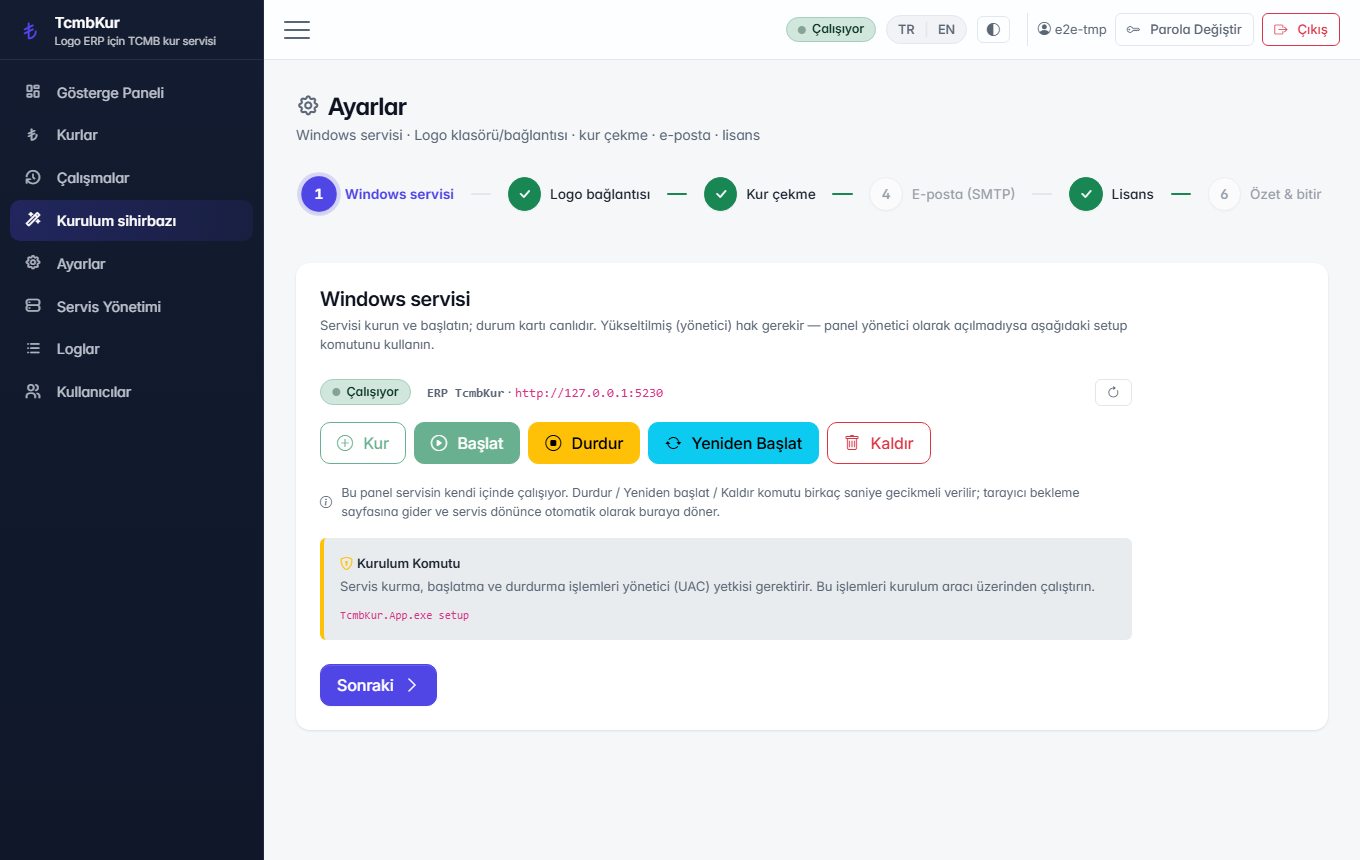
3.1 Windows service
Confirms that the service is installed and running. You can stop and start it from here; if the service already exists, the "Install" button is disabled.
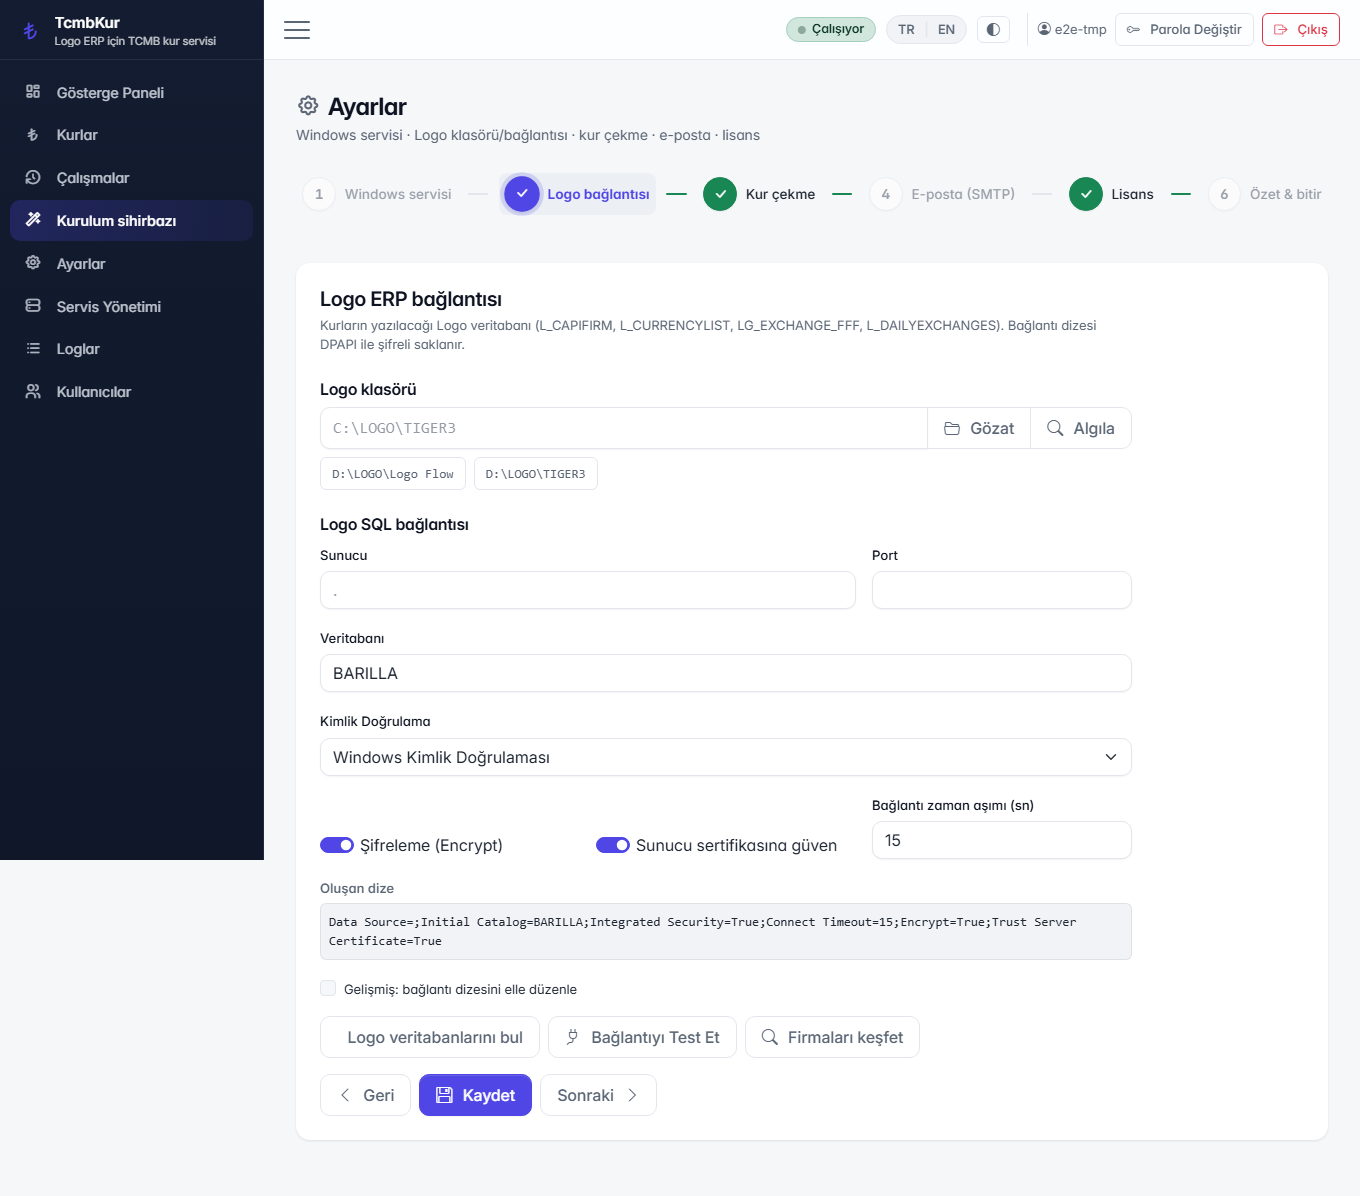
3.2 Logo connection
You enter the SQL Server host, the database and the authentication method, and test the connection in place. Then you pick the companies the rates are written for. The connection string is not typed by hand, it is composed from the fields; the password is never sent back to the browser.
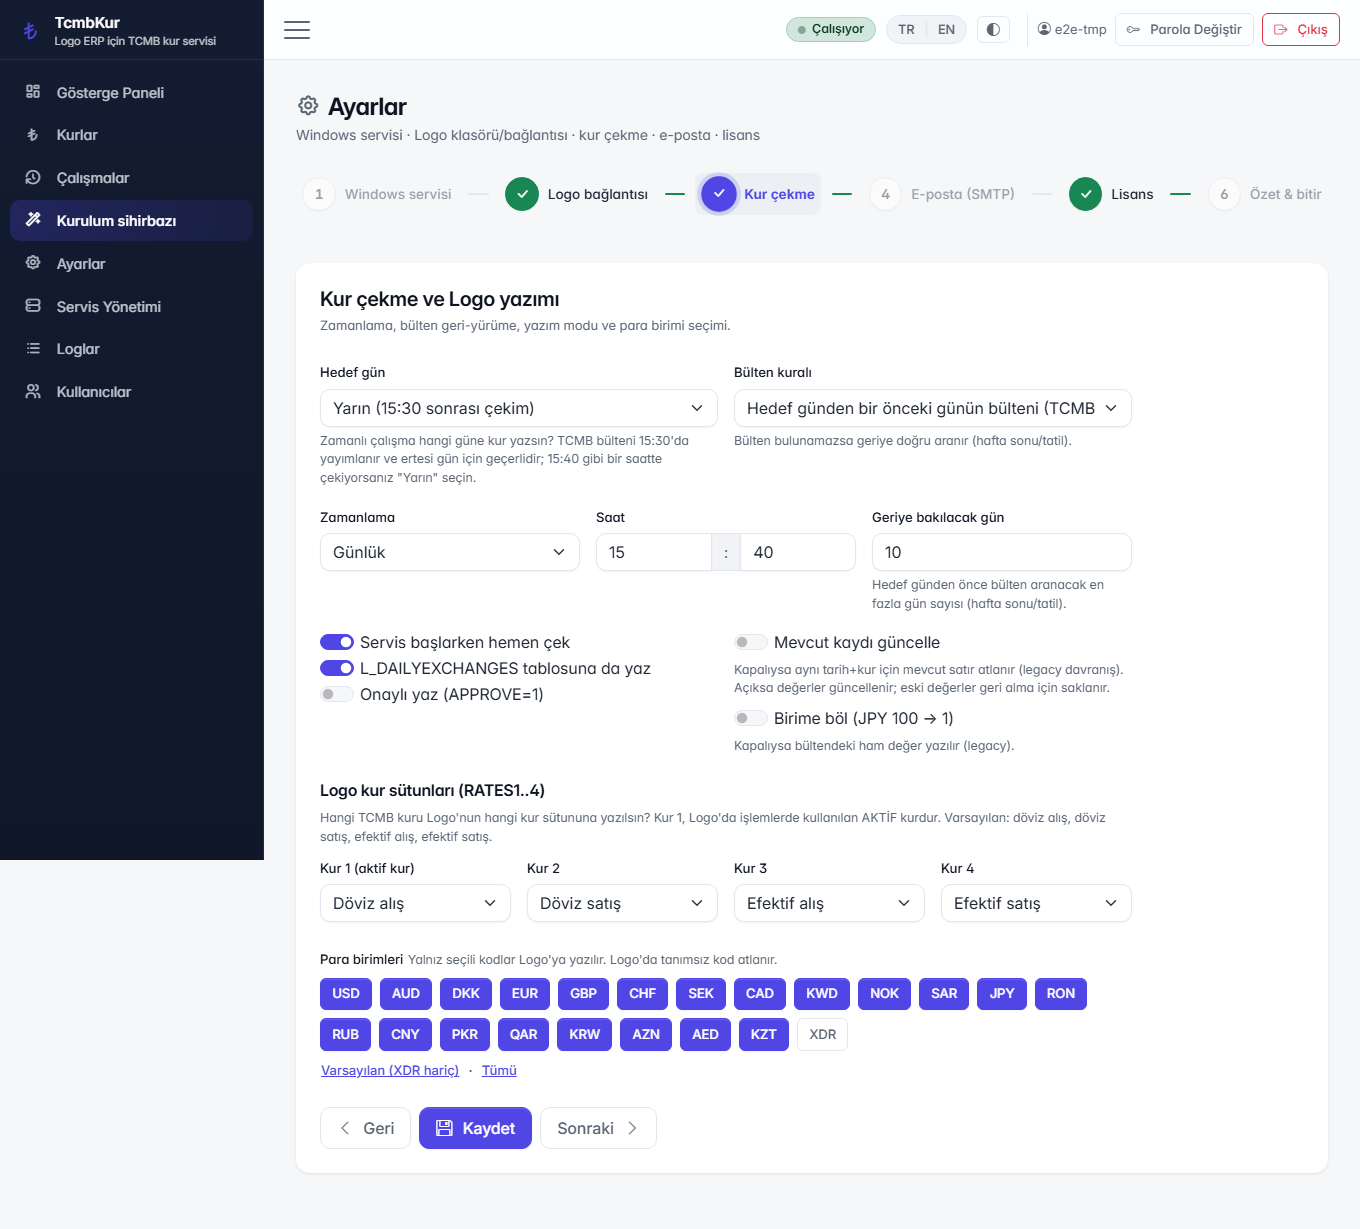
3.3 Fetching rates
This step decides which currencies are fetched, which Logo rate field each quotation is written to, and what time the daily run happens. The long version is on the Daily use page; in short:
- The TCMB bulletin is published every business day at 15:30 and is valid for the next business day.
- So target day D uses the D-1 bulletin; if there is none, the application walks back up to 10 days by default.
- Early-fetch protection is on by default: it prevents incomplete data being written before the bulletin hour.
- The write mode is insert-only or upsert; writing to
L_DAILYEXCHANGESand marking rowsAPPROVE=1are optional. - "Divide by unit" converts rates quoted per 100 units (Japanese yen, for example) into the form Logo expects.
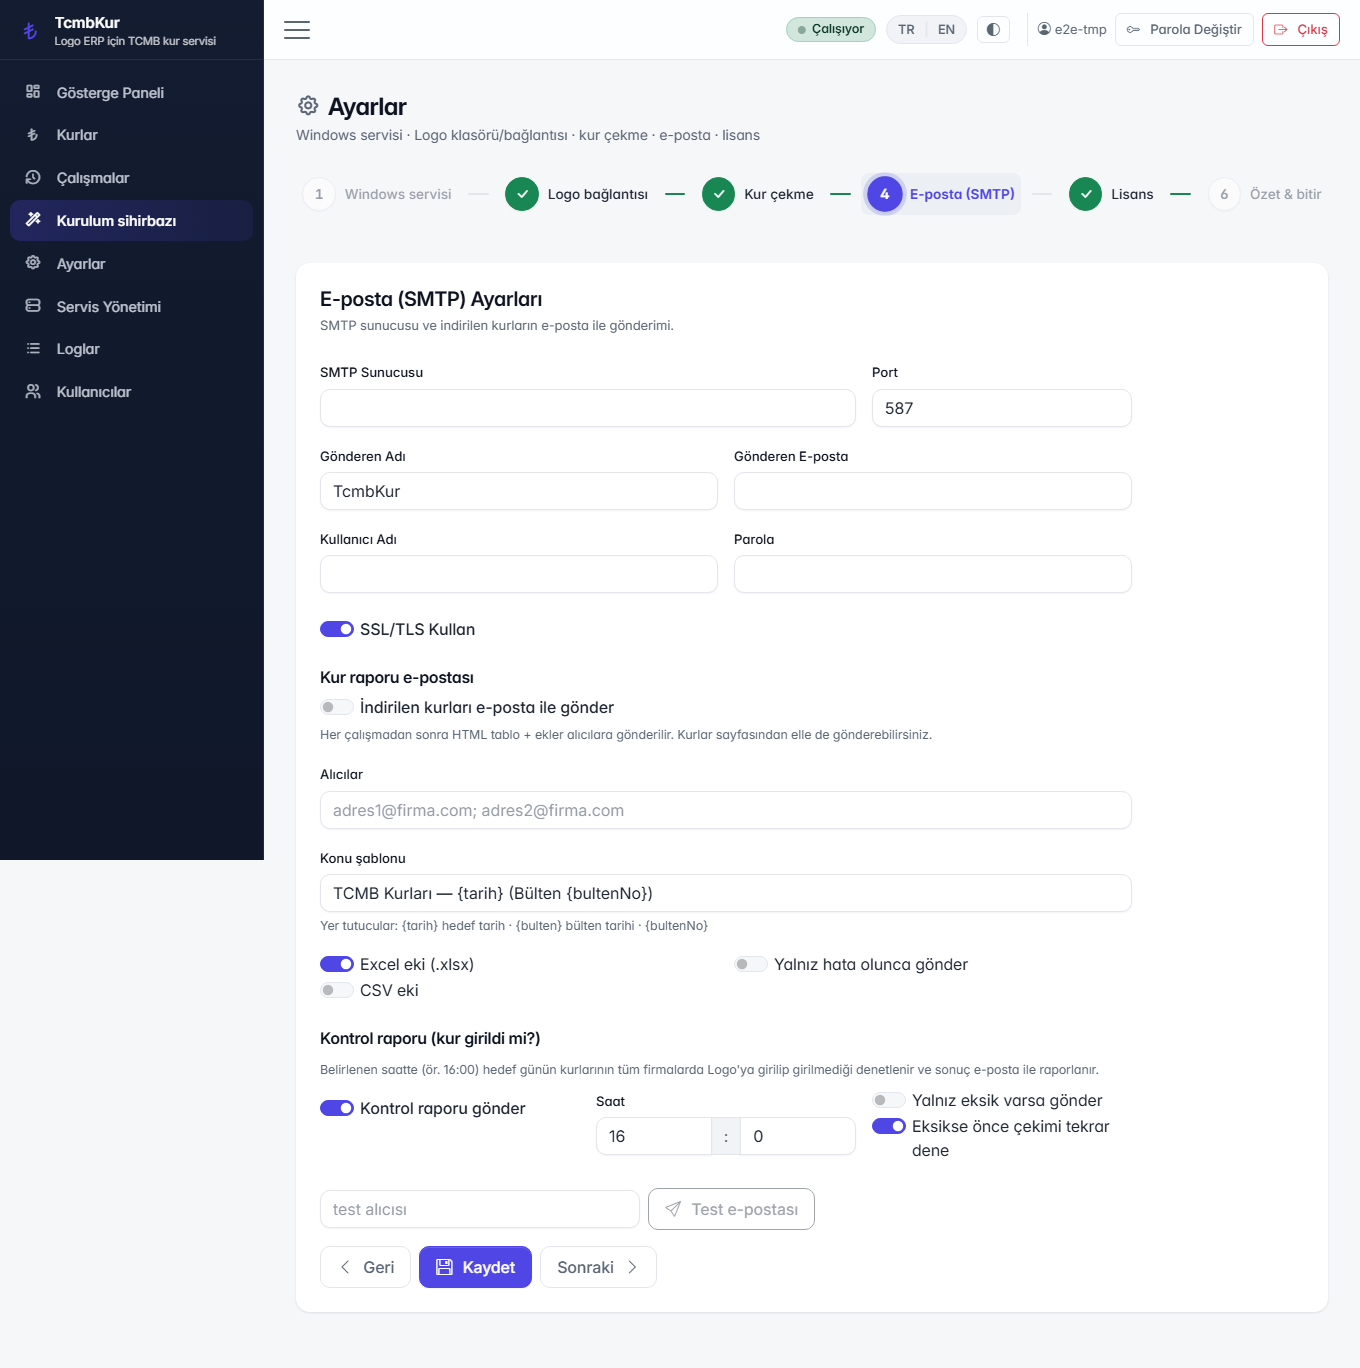
3.4 E-mail and the daily check report
You enter the SMTP settings and choose who receives the daily check report and when. The report answers one question — were rates written today, how many rows, were there errors — so a missed run is noticed even when nobody opens the panel for weeks.
3.5 Product activation
This step activates the installation on the ERP side. Just follow the guidance on screen — you are not asked for a key or a code. If anything goes wrong, see the FAQ or contact ERP support.
Activation concerns only the step that writes to Logo. Fetching rates, the panel, the logs and updates work regardless — a security patch is never withheld. ERP services being temporarily unreachable does not lock the application.
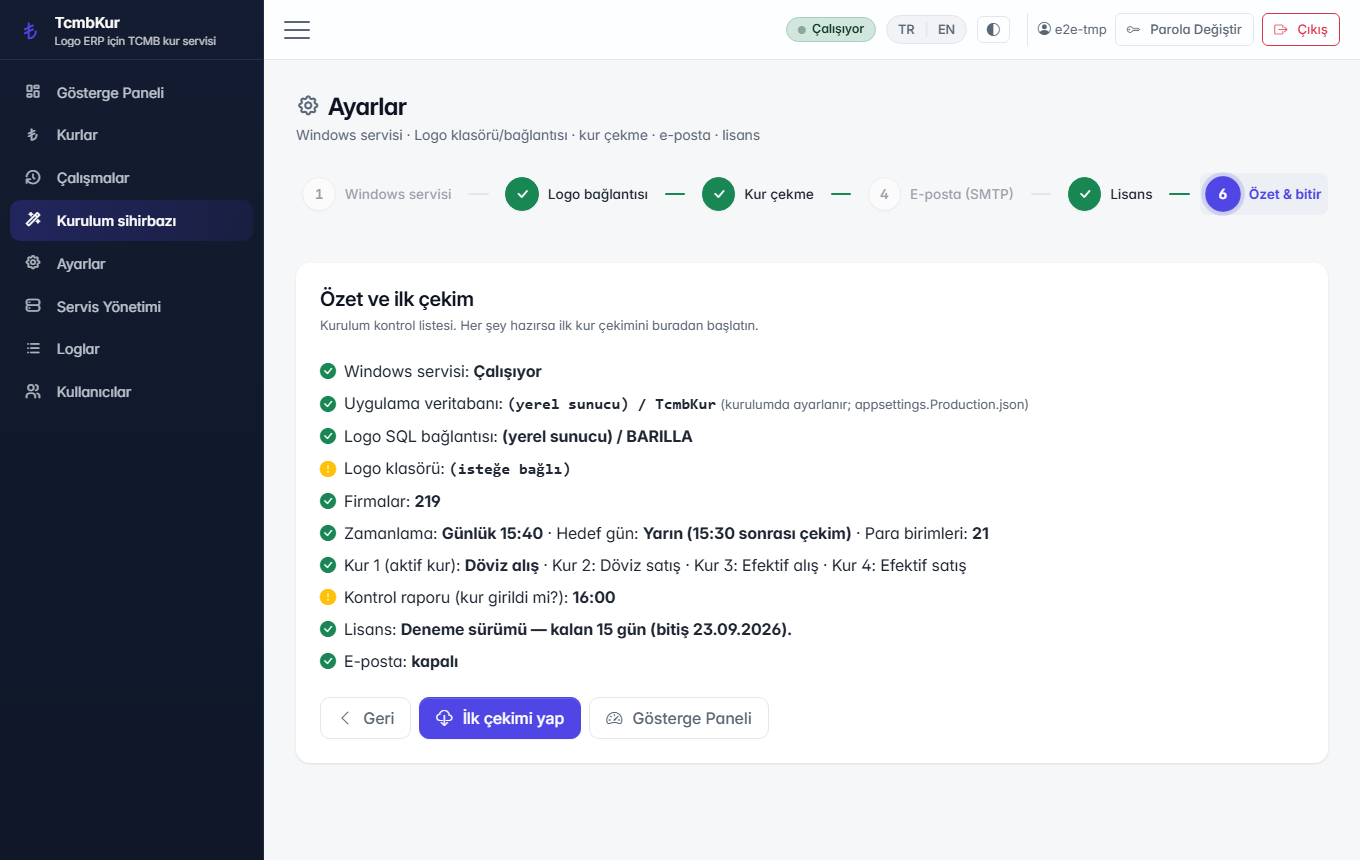
3.6 Summary and finish
The last step shows every choice on one screen. When you save, the settings are written to
the dbo.TCMBKUR_Config table in the Logo database and the scheduled run becomes active.
4. Service, health and logs
| Item | Where |
|---|---|
| Service name | ERP TcmbKur (running as LocalSystem) |
| Install folder | C:\ERP\TcmbKur (first-install default; later installs reuse the existing folder) |
| Listening address | C:\ERP\TcmbKur\listen-url.txt |
| Health gate | http://127.0.0.1:<port>/healthz → 200 + {status, version, db} |
| Logs | C:\ERP\TcmbKur\logs\tcmbkur-<date>.log (14 files kept) |
| Settings | Logo database, dbo.TCMBKUR_Config table |
| Secrets | C:\ERP\TcmbKur\keys |
To manage the service from the command line:
sc.exe query "ERP TcmbKur"
sc.exe stop  "ERP TcmbKur"
sc.exe start "ERP TcmbKur"
The same information appears in the panel on the /service and
/logs screens — see Daily use.
Backup
Two things are backed up together: the Logo database (which now also holds the
application's dbo.TCMBKUR_* tables)
and the C:\ERP\TcmbKur\keys folder. Some settings are encrypted with
the key in that folder; restoring the database alone leaves those fields unreadable.
For the database there is nothing extra to do — the application's tables live inside the Logo
database, so your existing Logo backup already covers them. Add nothing to your SQL Server backup
plan. The keys folder is small; include it in your file backup.
5. Updates
5.1 Automatic updates (default)
Installation leaves behind an updater that lives outside the application:
the %ProgramData%\ErpUpdate\TCMBKUR folder and the
ERP Update TCMBKUR scheduled task, which runs daily at 03:20
as SYSTEM. Keeping the updater outside is deliberate: a process that tries to update itself
locks its own files.
The flow is:
- The updater asks the ERP update service, sending the product, the version and the device identity.
- The answer is signed — including the "no update available" answer; a bare error code is not accepted.
- The package is downloaded; SHA-256, size and the version match are verified.
- The service is stopped and the files are swapped; the database,
keys,logs,listen-url.txtandappsettings.Production.jsonare preserved. - The service starts;
/healthzmust return 200 and report the target version. - If the gate fails, the previous version is restored automatically, the bad package is quarantined and the centre is notified.
Updates are independent of activation state: every installation receives the patch.
5.2 Manual updates
If automatic updates are turned off, or a version has to be raised by hand, download the
current TcmbKurKurulum.exe and double-click it — the same single file as the
first installation. It recognises the existing installation, upgrades it and keeps the
settings; you do not go through the setup screen again.
On the support route the equivalent is the zip's
install.ps1 — see section 2.
5.3 What is preserved
| File / folder | On update |
|---|---|
dbo.TCMBKUR_* tables in the Logo database | Preserved |
keys\ | Preserved |
logs\ | Preserved |
listen-url.txt | Preserved |
appsettings.Production.json | Preserved |
appsettings.json | Overwritten |
| Activation and device identity | Preserved (%ProgramData%\ERP\Lisans\TCMBKUR) |
Do not put durable settings in appsettings.json; that file is replaced by the
packaged copy on every update. Machine-specific settings belong in
appsettings.Production.json, and operational settings belong in the panel
(that is, the dbo.TCMBKUR_Config table).
Packages built with the -noupdate suffix carry no updater; they are meant for
environments where updates are managed from the outside.
6. Resetting the administrator password
The easiest way — the browser: open the login screen on the server itself
and click I cannot sign in (/kurtarma). Type the new password twice;
the account is created as an administrator if it is missing, or its password is reset and
the lock cleared if it exists.
That screen works only at the server console: if the request comes from anything other than 127.0.0.1, or passes through a reverse proxy, the page reports not found. Every reset is written to the application log.
The command-line way: the same reset is available from an administrator command prompt. If you do not supply a password, the tool generates one and prints it.
cd C:\ERP\TcmbKur
.\TcmbKur.App.exe reset-admin admin
.\TcmbKur.App.exe reset-admin admin --password NewPassword
7. Removal
powershell -ExecutionPolicy Bypass -File .\uninstall.ps1
The script removes the service and the scheduled update task. Activation and the device
identity are preserved unconditionally — reinstalling on the same machine
picks up where it left off. The application's dbo.TCMBKUR_*
tables stay in the Logo database; drop them by hand in SSMS if you need them gone (leave the Logo
data alone).